
Automated deployment of Hugo with Vultr VPS and Github Actions - Part 3
This is part 3 of this series where we’re going to get our Hugo blog building and the static files deployed to an NGINX server.
In this part we will be adding an NGINX docker image that will handle the build of our static site (Hugo) as well as deploy the static files to an NGINX server. We will use a multi-stage Dockerfile that will handle the build in one image and then bring things up on NGINX.
By the end you should have a completely automated docker-compose deployment with a full static site Hugo blog.
Don’t forget to check out Part 1 and Part 2 if you haven’t been following.
Setup hugo
We first need to get Hugo building and running and integrated into our docker-compose and Traefik.
Adding our hugo site
Go ahead and create the below folders and files, your Hugo site should sit under the site folder and contain the appropriate folders/template for your hugo site (content, data, themes etc.)
mkdir hugo
touch hugo/Dockerfile
touch hugo/site.conf
Update our .gitignore to exclude the relevent Hugo folders that we dont need to store in our repo. If you’re not relying on npm packages for your Hugo build, there is no need to add the node_modules path.
hugo/site/public
hugo/site/node_modules
hugo/site/resources/_gen
Your project folder structure should now look like the following:
hugo-and-traefik-docker-compose
    |   .gitignore
    │   docker-compose.yml
    │
    ├───traefik
    |       acme.json
    |       dashboard.toml
    |       traefik.toml
    └───hugo
            Dockerfile
            site.conf
NGINX Config
We will be using a custom site.conf file to manage any of our NGINX configuration. This is so we can define a specific path for our site as well as configure asset cache policies, access_logs and anything else we need to.
Ensure you update the server_name to match the url where your site is deployed
# Cache expiration map
map $sent_http_content_type $expires {
    default                    off;
    text/html                  epoch;
    text/css                   max;
    application/javascript     max;
    ~image/                    max;
    font/woff                  max;
}

# Our site configuration
server {
    listen       80;
    listen  [::]:80;
    server_name  www.yourdomain.com;

    expires $expires;

    access_log  /var/log/nginx/host.access.log  main;

    location / {
        root   /var/www/site;
        index  index.html;
    }

    error_page  404 /404.html;
}
Hugo Config (Docker)
We can go ahead and update our Hugo Dockerfile to look the the following:
# Stage 1 - Build our Hugo Site using node
FROM node:16-alpine as build

WORKDIR /build

# Download Hugo
ENV HUGO_VERSION 0.83.0
ENV HUGO_BINARY hugo_extended_${HUGO_VERSION}_Linux-64bit.tar.gz
RUN set -x && \
  wget https://github.com/spf13/hugo/releases/download/v${HUGO_VERSION}/${HUGO_BINARY} && \
  tar xzf ${HUGO_BINARY} && \
  mv hugo /usr/bin

# Download libraries for hugo extended
RUN apk add --update ca-certificates libstdc++ libc6-compat

# Copy our site and build it
COPY site site

RUN cd /build/site && \
  npm install && \
  hugo

# Stage 2 - Deploy our static files to NGINX
FROM nginx:alpine

# Remove the default config and copy files required for our new site
RUN set -x && \
  rm -f /etc/nginx/conf.d/default.conf && \
  mkdir -p /var/www/site

COPY site.conf /etc/nginx/conf.d/site.conf

COPY --from=build /build/site/public /var/www/site
The first stage (Hugo build) consists of:
- We’re giving this stage a name of build which you can see in the FROM section as build. We will use this stage name in our second stage for a COPY operation
- We’re using an official nodeJS docker image
- We setup a temporary WORKDIR that we will copy and build our Hugo site inside
- To ensure that we have a fixed version of Hugo we declare some environment variables for the version and filename
- We go ahead and download and un-tar the Hugo executable into our /usr/bin folder
- If you’re using Hugo extended, you’ll need to ensure that you download some additional libraries and prerequisites in order to get things running
- We copy our site from the Docker host inside the docker container to the site directory
- From here we can go ahead and run an
npm installto install any npm packages, and then we runhugoin order to build our static files, these will be available inside the public folder
The second stage (NGINX build) consists of:
- Use the official NGINX docker image
- Remove the default NGINX .conf file and create the appropriate path where we will be storing our static files (this should match the path defined in our site.conf)
- Copy our site.conf from our docker host to the NGINX conf.d folder (this folder will automatically load any .conf files by default)
- Copy our public folder from our build stage into the path we’re using to store our site
Add Hugo to docker-compose
We should be ready to add our new Hugo service (Dockerfile) into our docker-compose file, go ahead and update the docker-compose.yml file to look like the below:
Ensure you update the traefik.http.routers.blog.rule=Host(`www.yourdomain.com`) label to match the url where your site is deployed. It also allows us to easily run things locally for testing without being reliant on GitHub.
version: "3.3"
services:
  traefik:
    container_name: traefik
    restart: always
    image: traefik:2.4.8
    volumes:
      - /var/run/docker.sock:/var/run/docker.sock
      - /opt/srv/traefik/traefik.toml:/traefik.toml
      - /opt/srv/traefik/dashboard.toml:/dashboard.toml
      - /opt/srv/traefik/acme.json:/acme.json
    networks:
      - web
    ports:
      - 80:80
      - 443:443
  hugo:
    container_name: hugo
    restart: always
    image: hugo
    build:
      context: ./hugo
    volumes:
      - /opt/srv/hugo/site:/build/site
    networks:
      - web
    labels:
      - traefik.http.routers.blog.rule=Host(`www.yourdomain.com`)
      - traefik.http.routers.blog.tls=true
      - traefik.http.routers.blog.tls.certresolver=lets-encrypt
      - traefik.port=80
networks:
  web:
    external: true
As you can see we’re add some Traefik specific labels to the service. This allows us to easily tell our Traefik service what this container is used for.
- We give the Hugo service a router name - blog
- Give the router a host name - www.yourdomain.com
- Enable TLS
- Set the certificate to use our lets-encrypt certresolve - Configured in part 2
- Allow port 80 for the website (which will automatically get redirected to https)
Otherwise it’s all fairly standard with a mapped volume for the site folder on the docker host.
Testing
If you haven’t already done so, go ahead and update your DNS records for your domain with a new A record that matches www.yourdomain.com and points to the Vultr VPS IP Address.
Now we can go ahead and run:
docker-compose buildEnsure that the new Hugo service/Dockerfile successfully builds or fix any issues that may arise. These should only be related to Hugo and your specific site/template so I wont go into how to fix them.
After successfully building the new image, we can go ahead and bring things up fully:
docker-compose up -dBoth of your docker services should be up and running and if your new DNS record has propogated across the internet, you should be able to point your browser to www.yourdomain.com and see your Hugo site up and running on HTTPS! 😁😁
CI/CD
Now that the docker side of things is out of the way, lets go ahead and get our Continuous Integration and Continuous Deployment up and running using Github Actions!
Generate a new User and SSH Key
To ensure that there is separation of concerns betwen our admin user and our CI/CD pipeline, we should go ahead and generate a new SSH key and add it to our VPS.
You can refer to Part 2 for links on how to do this
We also need to ensure that this new user has r/w access and is the owner of the folder where we will be writing our files to, in our example this is /opt/srv
chmod 0755 /opt/srv
chown <deploy_user> /opt/srv
Replace <deploy_user> with the newly created user
Finally we will need to allow this user to run docker commands without sudo, we can easily do this by adding the user to the docker group as advised here
sudo groupadd docker
sudo usermod -aG docker $USER
logout
Adding secrets to our repo
We never want to store any sensitive information in our repository, so we will need to manually add some secrets to our repository (like our private key, vps server ip etc.) so that we can then reference them when we create our GitHub action.
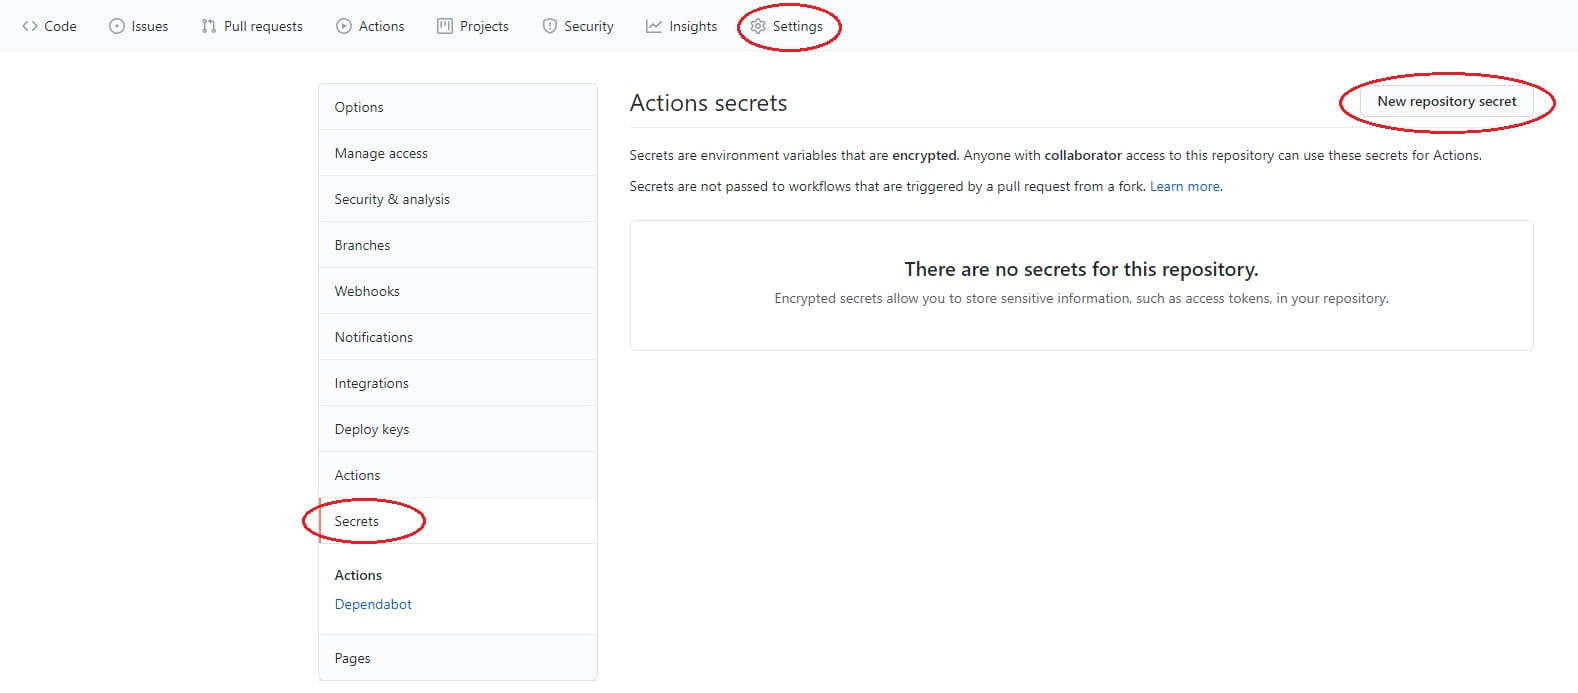
Go ahead and login to your GitHub account and open the repository that you’re storing all of your files inside (make sure that you’ve committed the above changes!). From there, select the Settings tab, then Secrets from the side menu, followed by the button for New repository secret.
Add secrets for each of the below values:
| Name | Example | Comment |
|---|---|---|
| VPS_IP | xxx.xxx.xxx.xxx | The IP address of your Vultr VPS |
| SSH_USERNAME | username | The user on the VPS to connect as |
| SSH_PORT | 22 | The port thats used for SSH |
| SSH_PRIVATE_KEY | -----BEGIN OPENSSH PRIVATE KEY----- <insert_key_here> -----END OPENSSH PRIVATE KEY----- | Your SSH Private key that you use to access the VPS (this should be tied to the above user) |
| SSH_PRIVATE_KEY_PASSPHRASE | password | The passphrase for the private key |
Create a new workflow in GitHub
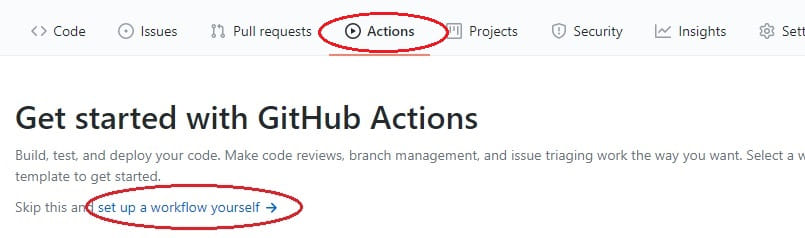
Go ahead and login to your GitHub account and open the repository that you’re storing all of your files inside (make sure that you’ve committed the above changes!). From there, select the Actions tab and the option to set up a workflow yourself
This will allow us to write a new .yml file that contains the code for our CI/CD pipeline or GitHub action.
Have a read through the comments in the template and you’ll get an idea of what is possible and what is currently configured, we will leave most of these defaults the same because it makes sense that we want to deploy a new copy of our site whenever there is a new commit to our main branch.
Go ahead and update the file to match the below:
# This is a basic workflow to help you get started with Actions

name: CI

# Controls when the workflow will run
on:
  # Triggers the workflow on push or pull request events but only for the main branch
  push:
    branches: [main]
  pull_request:
    branches: [main]

  # Allows you to run this workflow manually from the Actions tab
  workflow_dispatch:

# A workflow run is made up of one or more jobs that can run sequentially or in parallel
jobs:
  # This workflow contains a single job called "build"
  build:
    # The type of runner that the job will run on
    runs-on: ubuntu-latest

    # Steps represent a sequence of tasks that will be executed as part of the job
    steps:
      # Checks-out your repository under $GITHUB_WORKSPACE, so your job can access it
      - uses: actions/checkout@v2

      # Create a tar containg this repo, excluding the .git directory
      - name: Tar the repo for upload
        run: |
          mkdir ../repo_temp
          cp -TR . ../repo_temp
          rm -rf ../repo_temp/.git
          tar -C ../repo_temp/ -czf deploy.tar .

      # Upload the tar file to our VPS
      - name: Upload repo to VPS
        uses: appleboy/scp-action@master
        with:
          host: ${{ secrets.VPS_IP }}
          username: ${{ secrets.SSH_USERNAME }}
          key: ${{ secrets.SSH_PRIVATE_KEY }}
          passphrase: ${{ secrets.SSH_PRIVATE_KEY_PASSPHRASE }}
          port: ${{ secrets.SSH_PORT }}
          source: "deploy.tar"
          target: "/opt/srv"

      - name: Untar, then build and deploy
        uses: appleboy/ssh-action@master
        with:
          host: ${{ secrets.VPS_IP }}
          username: ${{ secrets.SSH_USERNAME }}
          key: ${{ secrets.SSH_PRIVATE_KEY }}
          passphrase: ${{ secrets.SSH_PRIVATE_KEY_PASSPHRASE }}
          port: ${{ secrets.SSH_PORT }}
          script: |
            tar -xzf /opt/srv/deploy.tar --overwrite --directory /opt/srv
            docker-compose -f /opt/srv/docker-compose.yml build
            docker-compose -f /opt/srv/docker-compose.yml up -d
From the above we’ve added 3x steps to our CI workflow:
- We create a new tar file that contains the entire repo
- We use the appleboy/scp-action plugin to upload the tar file to our VPS using the secrets that we saved earlier
- We then use the appleboy/ssh-action plugin to run comands on our VPS
- Untar the uploaded repo
- Build the docker images using docker-compose
- Bring our docker images up in detached mode
The reason that we’re performing the build step on the VPS is to prevent vendor lock in, so if we ever move our repo away from GitHub our docker-compose file handles all the build steps
Testing
Go ahead and commit those changes to the main.yml file and then select the Actions tab within your github repo.
You should see the workflow running, click into it and click into the build step. From here you can check the logs from the build job to make sure that each step completes successfully.
With any luck you should get a nice green tick! And you’ve just completed your CI/CD pipeline!! 🎉🎉